 |
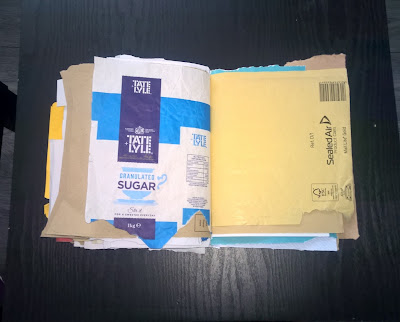
| Used envelopes, invoices and paper packing |
I've been stockpiling old papers for about six months now with a view to upcycle them into something else instead of sending them to the recycle plant. A number of these papers cannot be recycled because of the plastic, glue, tape, and so on stuck to them. My first idea was to mash all of the above with warm water to make a paper mache and then to build a pinata. I also thought about making some sheets of paper out of the paper mache - I've finally decided to make a scrapbook/notebook using a technique called 'perfect binding'.
I've read about this and seen a few videos, so this is a basic attempt to create a paperback out of old envelopes.
Day One;
I searched through the box of 'rubbish' to find paper that I could tidy up to use in this project. Using a metal craft ruler, I folded the paper and tore it to size, using the ruler as a straight weight. I left the plastic windows on the envelopes, I also left postage stamps and any print or writing- as long as one side was blank, such as the inside of an envelope, it was good to re-use.
 |
| the first thing to do is cut the paper so each piece has a straight side |
 |
| I used a metal crafting ruler as a knife, to fold and then slice off the sticky part of the used envelopes |
 |
| after collecting a pile of papers, I sandwiched them between two bits of card that used to be an envelope |
 |
| this bundle was then placed underneath a pile of heavy books and then pva glue was painted along the spine |
After creating a good pile of papers, roughly 80 sheets of varying sizes with the largest being about A5 in size, I glued them together along the 'spine' of the bundle. Each sheet needs to have a straight side, it doesn't matter if it's a bit rough. Professional books are made using a sharp knife, this is a basic upcycled scrapbook. As long as the pages are all straight down one side, it doesn't matter if they are different sizes. I sliced two pieces of card to use as a cover, the inner 'leaves' are all made from old invoices and thin envelopes, about the same weight/thickness as average copy paper.
There are used postage stamps and my address is printed or written on a lot of the inner pages. The invoices were mainly A4 in size so I folded those in half and tore them into two bits using the ruler. After carefully placing the straight edges together and the card at the front and back, I squashed the bundle of papers underneath a pile of books and a heavy brass plant pot.
With the book secure under all of this weight, I took a small paintbrush and painted a good amount of pva glue along the spine; the straight edges of paper. I did this twice so there was plenty of pva glue soaked into the paper and card. This is left overnight to dry, weighted down.
Day two;
 |
| the spine has dried and the pages are stuck in place! |
 |
| I'd also cleaned and sliced some sugar and flour paper packets |
 |
| so far so good- the book is held together! |
It's very satisfying to hold a book which was once a box of scraps, junk mail and envelopes from online shopping. I also have left over bits of lining paper from decorating and huge lengths of brown paper used as packing from a home delivery.
I took a small piece of the brown paper and ripped - again with the ruler- an almost A4 sheet to use as a cover on the book. This cover was then coated with pva glue and placed onto the book, smoothed over the front, then particular care given to press it down over the spine for extra support, finally being pressed down onto the back cover. I weighed this down with the bottle of pva glue and turned it over a couple of hours later so both sides could dry.
 |
| pasting pva over the cover |
 |
| pressing the glue into the dry spine for more support |
 |
| weighed down a little with the bottle of glue |
Day three;
The whole book is dry now and I decided to draw or paint something onto the cover. I planned on some basic lettering or a quote on the front, then decided to have a go at a sketch. Using a reference image that I love of a stag (artist unknown), I drew a stag using a normal writing pencil.
 |
| the reference art on the right is one of my favourites |
 |
| the finished sketch, left |
 |
| Ready to use! |
I'm amazed at how well this turned out- the idea was that it is a basic scrapbook and the finished item is much better than I imagined it to be! I thought it would have fallen apart or been uneven on all sides, it's surprisingly neat all round and the rough bits, the different lengths of paper and the rough cover is a nice part of it's character.
Tools needed to upcycle old paper and envelopes;
Heavy ruler OR scissors/craft knife to tear or cut paper to size
pva glue and brush (or use fingers) to paste spine and cover
heavy items such as books or tins to weigh down the bundle of papers
pencil or scraps, stickers, glue, paints etc for decoration
ALSO
large pile of old junk mail, envelopes, invoices, wrapping paper etc
By Volk B May 2020
Comments
Post a Comment